Practical Workflows > Printer Driver > Installation (Windows)
*
Installation (Windows)

Return to Overview


  • How to Install the Driver

The printer driver can be installed using the CD-ROM accompanying the machine, or downloaded from the Canon website.
This section describes the procedure for installing a Windows UFRII driver using the CD-ROM.

Using the CD-ROM, follow the instructions on the screen for a smooth installation process.

  • Features of the Installer
  • Simultaneously installs the driver for multiple machines.
  • Automatically detects other machines on the network.
  • Collectively updates older versions of the driver.
  • There are two types of installers available for download from the Canon website, Setup and inf, with differing installation methods. For instructions on installing using the Setup and inf files, see "Reference Information - Installing the Driver Using the Setup Installer," or "Reference Information - Installing the Driver Using the Inf File."

  1. Insert the CD-ROM into your computer.

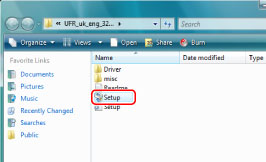
The CD-ROM Setup screen is displayed.

If the CD-ROM Setup screen is not displayed, follow the procedures below.

  • If you are using Windows XP:
  • Double-click [My Computer] → the CD-ROM drive icon → [MInst.exe].
  • If you are using Windows Vista:
  • If the [AutoPlay] dialog box is displayed, click [Run MInst.exe].
  • If Windows Explorer is displayed, double-click the [MInst.exe] icon.
  • If nothing happens, click [] (Start) menu → [Computer] → double-click the CD-ROM drive icon.
  • If you cannot locate the [MInst.exe] icon on your CD-ROM:
  • On your CD-ROM, double-click the [UFR II] folder → [us_eng] → [32BIT] → [Setup.exe] → proceed to step 4.

  1. Click [Installation] on the CD-ROM Setup screen.


  1. Confirm that the printer driver is selected → click [Install].

  • If the [User Account Control] dialog box is displayed, perform the following operations:
  • If you are logged on as an Administrator user, click [Allow] or [Continue].
  • If you are logged on as a Standard user, enter the Administrator password → click [OK].

  1. Click [Next] on the [Welcome to the Setup Wizard for the UFR II Printer Driver] screen.


  1. Click [Yes] on the [License Agreement] screen.


  1. On the [Printer Installation] screen, select [Search for Network Printers to Install] → select [Reactivate Printers in the Sleep Mode and Search] → click [Next].


  1. Click [Next].

If you have already installed a printer driver, select [Add Printers] on the [Select Process] screen shown below → click [Next].


  1. On the [Select Printers to Install] screen, click [Select All], or select the desired devices from [Printer List] → click [Add].

If you are using Windows Vista, you can switch between tabs for displaying IPv4 and IPv6 devices by clicking the [IPv4 Devices] or [IPv6 Devices] tab.

Adding a printer to [Printer List for Driver Installation] enables you to click [Next].

If you click [Next], the message indicating that a port is being created is displayed.


  1. Confirm the installation settings → click [Start].


  1. Click [Yes] when the warning message appears.


  1. Installation starts.


  1. Click [Exit].

  • To install a printer driver it is not necessary to restart your computer.
  • In cases that require the computer be restarted, such as updating a printer driver, [Restart My Computer Now] is automatically selected. For such cases, click [Restart] to restart the computer.

Reference Information
  • Installing the Driver Using the Setup Installer

To install a driver using the Setup file, follow the procedures below.

(1) Download the printer driver Setup file from the Canon website.
(2) Double-click [Setup.exe].

Perform the same procedures as the CD-ROM installation.

  • Installing the Driver Using the Inf File

To install a driver using the inf file, follow the procedures below.

(1) Download the printer driver from the Canon website.
(2) Double-click [Setup.exe].
  • If you are using Windows XP:

Click [Start] → [Printers and Faxes] (or [Start] → [Control Panel] → [Printers and Faxes] → [Printers and Faxes]) → click [Add a printer] in [Printer Tasks].

Installation starts.

  • If you are using Windows Vista:

From the [] (Start) menu, click [Control Panel] → [Printers] → [Add a printer]. Installation starts.

  • If you are using Windows 2000, click [Start] → [Settings] → [Printers] → double-click the [Add Printer] icon to start the installation.

(3) On the [Install Printer Software] screen, click [Have Disk] → specify the downloaded inf file (xxx.inf).
(4) Follow the instructions on the screen to add a printer driver, update a previously installed printer driver, set a default printer, or print a test page.
  • If you install the driver using the inf file, restart your computer after installation is completed. If you do not restart the computer, the printer driver may not perform correctly.

  • Back To Top