Registering a File Server Address
You can store the information needed to save scanned documents in the file server, such as the protocol, host name, and pathname of the destination folder.
1.
Press [Scan and Send] → [Address Book].
2.
Press [Regist./Other].
3.
Press [Register/Edit].
4.
Press [Register New Dest.].
5.
Press [File].
6.
Select an address list from Address List 1 to 10.
Address lists are a convenient way to classify destinations.
7.
Press [Name].
8.
Enter a name for the destination → press [OK].
NOTE
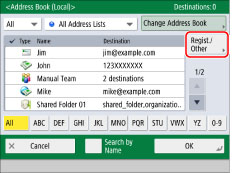
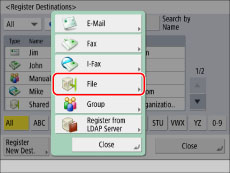
The first character that you enter for the name is used for sorting the destination list when you press keys, such as [ABC], [DEF], and [GHI], on the Address Book screen. If [Search by Name] is pressed on the Address Book screen, a screen for narrowing the search in the Address Book appears.
9.
Press [Next].
10.
Select the protocol from the <Protocol:> drop-down list.
NOTE
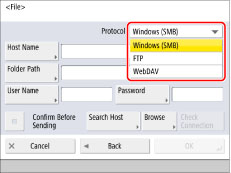
For more information on the available protocols, see "Specifying a File Server Using the Keyboard."
11.
Press [Host Name].
12.
Enter the host name → press [OK].
If [WebDAV] is selected for <Protocol:>, press [Next].
13.
Press [Folder Path].
14.
Enter the path to the folder → press [OK].
15.
Press [User Name].
16.
Enter the user name → press [OK].
17.
Press [Password].
18.
Enter the password → press [OK].
If you set [Confirm Before Sending] to 'On', a screen to enter the registered password appears when you try to send to a file server.
If you want to register a file server in a group address, set [Confirm Before Sending] to 'Off'. You cannot send to a group address including a file server in which [Confirm Before Sending] is set to 'On'.
If you select [Windows (SMB)] as the server protocol, you can specify the file server by pressing [Browse]. For instructions on using the Browse key, see "Specifying a File Server Using the Search Host Key (Windows (SMB))."
If you select [Windows (SMB)] as the server protocol, you can specify the file server by pressing [Search Host]. For instructions on using the Search Host key, see "Specifying a File Server Using the Search Host Key (Windows (SMB))."
You can press [Check Connection] to check the connection to the file server. If an error message is displayed, confirm the settings in steps 10 to 18.
NOTE
If you specify the destination that you set to 'On' for [Confirm Before Sending] as the forwarding destination, the screen to enter the password does not appear. The registered password is used and forwarding is performed.
If you are managing users by login service, such as User Authentication, you can set to automatically enter authentication information on the screen that appears when using various send functions. (See "Authentication Method Settings for Sending Operations.")
Depending on the authentication method you use, the screen to enter the password may not appear.
For information on the login user name and password for the file server, contact your server administrator.
19.
Press [OK].
If you are managing Address Book access numbers, perform the procedure in step 13 of "Registering an E-Mail Address."
20.
Press [Close] → [OK].

NOTE
For examples of the settings that are needed to send documents to a file server, see "Setting Up a Computer as a File Server" for the SMB/CIFS network and "Setting Up a Computer as a File Server" for the TCP/IP network.
You can only use UPN if you are sending to a computer belonging to a domain operated with Active Directory.
» Scan and Send » Storing New Addresses » Registering a File Server Address
0R9W-107