Registering a File Server Address
1.
Press

(Settings/Registration).
2.
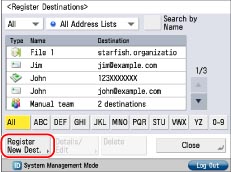
Press [Set Destination] → [Register Destinations] → [Register New Dest.].
3.
Press [File].
4.
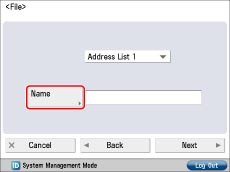
Select an address list from Address List 1 to 10.
Address lists are a convenient way to classify destinations.
The file server address that you enter will be stored in the address list that you select here.
5.
Press [Name].
6.
Enter a name for the file server → press [OK].
7.
Press [Next].
8.
Select the protocol from the <Protocol:> drop-down list.
9.
Press [Host Name].
10.
Enter the host name → press [OK].
If [WebDAV] is selected for <Protocol:>, press [Next].
11.
Press [Folder Path].
12.
Enter the path to the folder → press [OK].
13.
Press [User Name].
14.
Enter the user name → press [OK].
15.
Press [Password].
16.
Enter the password → press [OK].
If you set [Confirm Before Sending] to 'On', a screen to enter the registered password appears when sending to the registered file server.
If you want to register a file server in a group address, set this setting to 'Off'. If you set it to 'On', you cannot send to the group address.
If you select [Windows (SMB)] as the server protocol, you can specify the file server by pressing [Browse]. For instructions on using the Browse key, see
"Specifying a File Server Using the Search Host Key (Windows (SMB))."If you select [Windows (SMB)] as the server protocol, you can specify the file server by pressing [Search Host]. For instructions on using the Search Host key, see
"Specifying a File Server Using the Search Host Key (Windows (SMB))."You can can press [Check Connection] to check the connection to the file server. If an error message is displayed, confirm the settings in steps 8 to 16.
|
NOTE
|
|
If you specify the destination that you set to 'On' for [Confirm Before Sending] as the forwarding destination, the screen to enter the password does not appear. The registered password is used and forwarding is performed.
|
17.
Press [OK] → [Close].
If you are performing Access Number Management for the Address Book, perform the following operation.
Press [Next] → [Access No.] → [Access No.].
Enter the access number using

-

(numeric keys) → press [Confirm].
Enter the access number again for confirmation → press [OK] → [OK].
|
NOTE
|
|
UPN can be used only if you are sending to a computer belonging to a domain operated with Active Directory.
|
 (Settings/Registration).

 -
-  (numeric keys) → press [Confirm].