e-ManualTopSite mapHelpGlossary

Category Top

What This Machine Can Do

Overview of This Function

Things You Must Do Before Using This Machine

Flow of Sending Operations

Canceling a Job

Specifying Destinations

Specifying Destinations Using the Address Book (Local)

Specifying Destinations Using the Address Book (Remote)

Specifying Destinations Using the Address Book (LDAP Server)

Specifying Destinations Using the One-Touch Buttons

Specifying a Destination by Entering an E-mail Address

Specifying Destinations by Entering an I-Fax Address

Specifying a Destination by Entering a File Server

Specifying a File Server Using the Keyboard

Specifying a File Server Using the Browse Key (Windows (SMB))

Specifying a File Server Using the Search Host Key (Windows (SMB))

Storing in an Advanced Box

Setting Your Personal Folder as the Destination

Setting Your Own E-Mail Address as the Destination

Setting Cc and Bcc Addresses

Checking/Editing/Deleting the Information for a Destination

Favorite Settings

Recalling Previous Send Jobs

Storing New Addresses

Registering an E-Mail Address

Registering an I-Fax Address

Registering a File Server Address

Registering a Group Address

Registering an Address Obtained via an LDAP Server

Registering an Advanced Box Address

Storing/Editing/Deleting One-Touch Buttons

Checking/Editing/Deleting a Stored Address

Registering/Editing/Deleting Favorite Settings

Registering/Editing Favorite Settings

Checking Favorite Settings

Editing a Name/Comment

Deleting Favorite Settings

Assigning Shortcuts

Switching the Color Mode

Setting the Resolution

Specifying/Registering Scan Sizes

Setting the File Format

Trace and Smooth

Compact PDF or XPS

Searchable PDF/XPS/OOXML

Adding a Digital Signature to a PDF or XPS

Encrypting PDF Files

Applying a Policy

Preview

2-Sided Original

Adjusting Density Manually

Adjusting Background Density

Selecting the Original Type

Adjusting the Image Sharpness

Erase Frame

Delayed Send

Specifying the Orientation of the Original Image

File Name

Subject/Message

Reply-to

Setting E-Mail Priority

Receiving I-Fax Documents

Processing Received Documents

Receiving Documents

Setting the Memory Lock Mode

Forwarding Received Documents

Available Paper Sizes

When Problems Occur

Questions & Answers

Top » Scan and Send » Adjusting the Image Sharpness
Adjusting the Image Sharpness
0C1Y-0WJ
You can adjust the sharpness to scan text and lines with a sharper contrast. You can also reduce the sharpness for the half-tone dots of printed photos, etc. to scan with a softer image.
Low
If you scan an original containing halftones, such as a printed image, the moiré effect (a shimmering, wavy pattern) may occur. In this case, you can lessen this moiré effect by using [Low] as the setting.
Low Set
Low Not Set
High
This setting enhances the edges of original images so that faint or fine text is reproduced with a sharper contrast. This setting is particularly suited for scanning blueprints and faint pencil drawn images.
High Set
High Not Set
1.
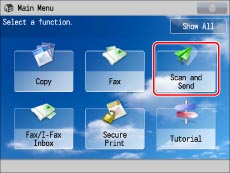
Press [Scan and Send].
2.
Specify the destination → press [Options] → [Sharpness].
3.
Adjust the sharpness → press [OK] → [Close].

IMPORTANT
The setting for [Sharpness] is invalid when all of the conditions below are met. The setting is reflected in the image displayed for [Preview], but not for the actual scanned image.
The color mode is Black & White
The original type is set to Text
The resolution is set to 100 x 100 dpi, 150 x 150 dpi, or 200 x 100 dpi
To activate [Sharpness], change the settings.