Automatic Gradation Adjustment
When copying without using any special settings, if you notice irregularities in the gradation or density of the copy, you can calibrate the machine so that it adjusts to these irregularities.
This is a precise recalibration that is made to the gradation and density settings of the machine. The procedure involves making test pages and placing them on the platen glass for scanning. Once this is complete, the machine automatically corrects the irregularities.
|
IMPORTANT
|
|
Make sure that you place the test pages properly. Accurate recalibrations of the gradation and density settings of the machine cannot be made if the test pages are not scanned correctly.
Three test pages are output by the machine during this adjustment. This machine adjusts the toner and print speed according to the paper type. To make effective adjustments, select the correct paper type.
If Auto Adjust Gradation does not work well with heavy paper, print a test page with normal paper.
|
|
NOTE
|
|
Test pages are not counted as part of the copy or print total page counts.
|
1.
Press

(Settings/Registration).
2.
Press [Adjustment/Maintenance] → [Adjust Image Quality] → [Auto Adjust Gradation].
3.
Select the paper source → press [OK].
4.
Press [Start Printing].
|
NOTE
|
|
If paper appropriate for the test page is not loaded in any paper source, a message asking you to load the appropriate paper appears. Load the appropriate paper in a paper source.
|
5.
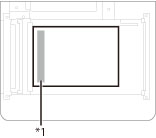
Place the first test page on the platen glass → press [Start Scanning].
*1 Place the test page face down on the platen glass, with the black band along the left edge of the platen glass
6.
Remove the first test page from the platen glass → press [Start Printing].
7.
Place the second test page on the platen glass → press [Start Scanning].
*1 Place the test page face down on the platen glass, with the black band along the left edge of the platen glass
8.
Remove the second test page from the platen glass → press [Start Printing].
9.
Place the third test page on the platen glass → press [Start Scanning].
*1 Place the test page face down on the platen glass, with the black band along the left edge of the platen glass
10.
Remove the third test page from the platen glass.
 (Settings/Registration).

