 CAUTION CAUTION |
|
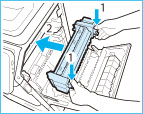
The fixing assembly and its surroundings inside the printer are hot during use. Make sure the fixing assembly is completely cool before removing the jammed paper. Touching the fixing assembly when it is still hot may result in burns.
|
 |
|
|
CAUTION |
|
The fixing assembly and its surroundings inside the printer are hot during use. Make sure the fixing assembly is completely cool before removing the jammed paper. Touching the fixing assembly when it is still hot may result in burns.
|
|
NOTE
|
|
In the following cases, contact your local authorized Canon dealer.
You cannot complete the procedure because paper is entangled around the fixing assembly and cannot be removed.
You can see the paper jammed inside the fixing assembly but it cannot be removed.
|
 |
|
|
NOTE
|
|
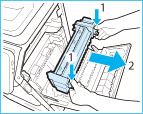
Gently push the fixing assembly back into the machine until it clicks into place.
|
|
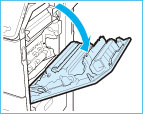
CAUTION |
|
When closing the right cover of the main unit, be careful not to get your fingers caught, as this may result in personal injury.
|
|
NOTE
|
|
Gently close the cover until it clicks into place in the closed position.
The screen indicating the location of the paper jam repeatedly appears on the touch panel display until the paper jam is entirely cleared.
|

