Send Features of the WSD Scan
This section describes how to use the send function of the WSD Scan.
IMPORTANT
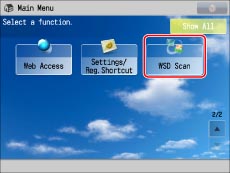
You can only perform a WSD scan under the following conditions:
Paper size:
LTR
Color mode:
Color
Resolutions:
300 dpi (fixed setting)
File format:
BMP, JPEG, PNG, TIFF

1.
Place your originals.
IMPORTANT
You cannot scan 2-sided originals even if you are using a feeder. Scan each side of a two-sided original separately.
The available scanning size is LTR. For example, if you set LGL originals, only LTR size is scanned.
NOTE
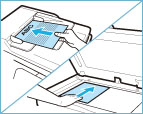
For instructions on placing originals, see "Placing Originals."
2.
Press [WSD Scan].
3.
Select the destination.
Computers in the same domain in which the driver for the WSD Scan function is installed are listed. Select the desired destination.
4.
Press [Start].
If the destination [Scan to "computer name"] is selected:
A screen prompting you to select a program appears on the computer screen. Scanning is complete after selecting the program.
If the destination other than [Scan to "computer name"] is selected:
Windows Explorer starts and a scanned file is displayed on the computer screen.
NOTE
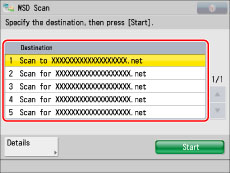
Up to 40 destinations are displayed.
You cannot use [Send for OCR to "computer name"] when selecting the destination. If you want to use the OCR function, see "Searchable PDF/XPS/OOXML."
» Scanner » WSD Scan » Send Features of the WSD Scan
0JJC-142