| Network Connection |
| Remark |
|
|
|||||
Connect the machine to the network correctly, and confirm that the power is ON. |
Insert the User Software CD-ROM to the computer. |

Click [Installation] to install the driver software.
If the CD-ROM Setup screen is not displayed, click [start] on the Windows task bar → [My Computer]. |
Click [Next] under [Connect Printer to Computer via Network]. If you are installing the software on a computer running Windows Server 2003/Server 2008, the screen for this step is not displayed. |


Click [Install]. |
Read License Agreement carefully and click [Yes]. |


Click [Next].
|
Select your machine on the list, then click [Next]. Make sure that the machine name is highlighted. |


Click the drivers you want to install, then click [Next]. Select [Printer] and [Fax], if you use imageRUNNER1025iF.
|
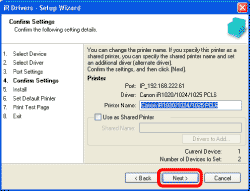
Verify the appropriate printer name is displayed and click [Next]. Repeat this step for each driver that you have selected.
|


Click [Next]. |
Click [Start]. |


Verify that the printer you want to set as a default printer is selected and click [Next]. |
If you want to print out a test page, check the printer name and click [Next]. A printer test page is printed out from the machine.
|


Click [Exit]. |
Click [Next]. |


Click [Restart Computer Now (Recommended)], then Click [Restart]. |
Remove the User Software CD-ROM from the computer.
|


Verify that the driver has been installed successfully and that the machine has been set as the default printer.
|
Windows XP/Server 2003: From the Windows task bar, click [start] → select [Printers and Faxes]. |
Right-click the printer icon for this machine → Select [Set as Default Printer] from the [File] menu. |