Specify the date and time display formats and set the current date and time.
The specified date and time are used for some fax functions and reports.
1
Press [ ] (Menu).
] (Menu).2
Select <Timer Settings> using [ ] or [
 ] and press [OK].
] or [] and press [OK].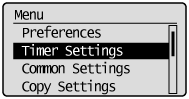
3
Select <Time & Date Settings> using [] or [] and press [OK].
] or [] and press [OK].
4
Select the setting using [] or [] and press [OK].
] or [] and press [OK].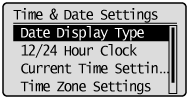
|
Settings
|
Purpose
|
What to do
|
||||||
|
<Date Display Type>
|
Specify the date display format.
|
Select one of the following display formats using [
] or [] and press [OK].The formats include the following. MM/DD/YYYY
DD/MM YYYY
YYYY MM/DD
|
||||||
|
<12/24 Hour Clock>
|
Specify the time display format.
|
Select one of the following display formats using [
] or [] and press [OK].The formats include the following. 12 Hour (AM/PM)
24 Hour
|
||||||
|
<Current Time Settings>*
|
Specify the current time and date.
|
Use [
] or [] to enter time and date, or to switch between <AM> and <PM>. To move the cursor, press [ ] or [ ] or [ ]. ]. |
||||||
|
<Time Zone Settings>
|
Specify the time zone.
|
Select the time zone using [
] or [] and press [OK]. |
||||||
|
<Daylight Savings>
|
Specify whether to use daylight saving time.
|
To use daylight saving time,
|
|
*
|
Make sure to configure <Time Zone Settings> before configuring this setting (If you change <Time Zone Settings>, <Current Time Settings> is changed accordingly).
|
5
Press [] (Menu) to close the menu screen.
] (Menu) to close the menu screen.