You can manually print the Send Job List when required.
Optional products are required to use the Fax function. For information on the optional products required to use the Fax function, see
"Optional Products Required for Each Function."The items printed for the list and a description of each item are indicated below.
The date and time that the send job was specified is printed in 24-hour notation. If SSO-H is set as the login service, the user name used for login is printed below the start time. When the machine cannot specify the user (for example, when automatically forwarding), the user name is not printed.
The time (in 24-hour notation) at which the document started to be transmitted is printed. The start time is printed only for send jobs that have been set with the Delayed Send setting.
The address of the recipient is printed.
|
NOTE
|
|
If the ACCESS MANAGEMENT SYSTEM KIT is enabled when a logged in general user prints a Send Job List, jobs performed by other users are printed with "***" in the Destination Address column. To see information in the Destination Address column, log in as an administrator.
|
The DESTINATION ID of the recipient is printed.
|
NOTE
|
|
If the ACCESS MANAGEMENT SYSTEM KIT is enabled when a logged in general user prints a Send Job List, jobs performed by other users are printed with "***" in the Destination ID column. To see information in the Destination ID column, log in as an administrator.
|
Prints the four digit number which is automatically assigned to a send job that is accepted.
The type and mode of transmission are printed.
Transmission type: Send (TX)
Mode of transmission: Printer, FTP, SMB, WebDAV, Mail Box (MAIL BOX), I-Fax (I-FAX), E-mail (E-MAIL), Fax (FAX)
The number of pages that were sent is printed.
|
NOTE
|
|
A list of fax, e-mail, I-fax, file server, and mail box transmissions is printed on the Send Job List.
If a field exceeds its display capacity, only those characters that fit in the display are printed.
|
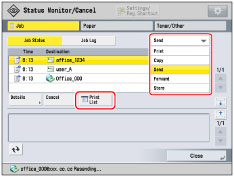
Printing the Send Job Status
1.
Press

(Status Monitor/Cancel).
2.
Press [Job] → [Job Status].
3.
Press the drop-down list → select [Send] → press [Print List].
4.
Press [Yes].