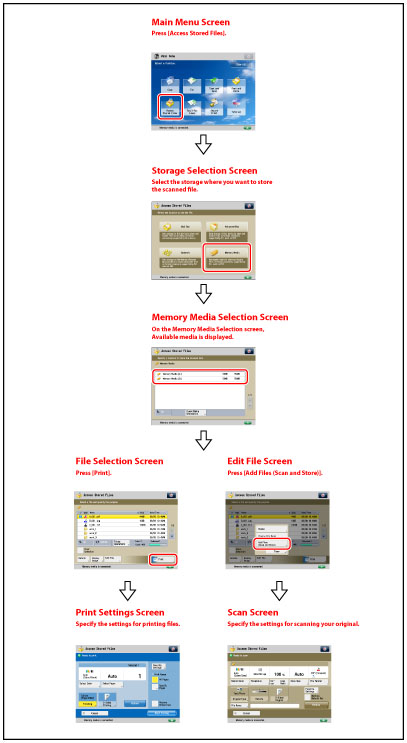
|
1
|
[Up]
Press to return to the upper level.
|
|
2
|
[Check Media Information]
Press to check the details of memory media.
|
|
3
|
 Press to remove the memory media.
|
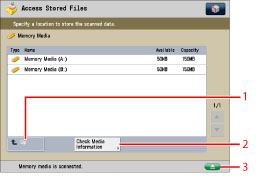
|
1
|
 You can specify the following settings:
Register to Quick Menu (See "Quick Menu.")
|
|
2
|
[Name]
Press to sort the files by name, in ascending or descending order.
[Date/Time] Press to sort the files by date/time, in ascending or descending order. |
|
3
|
[Folder Operations]
Press to display the menu for editing the folders in the memory media.
|
|
4
|
[Display Image]
Press to view the contents of the selected file.
|
|
5
|
[Edit File]
Press to add a file, delete the selected file, or change a file name.
|
|
6
|
[Print]
Press to print the document. |
|
7
|
[Details]
Press to check the details of the selected file. |
|
8
|
[Clear Selection]
Press to cancel the selection of a file. |
|
9
|
[Up]
Press to return to the upper level.
|
|
10
|
[Update]
Press to update the contents of the memory media.
|
|
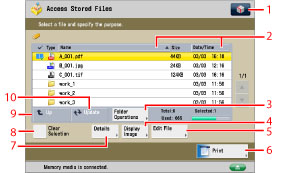
1
|
[Delete]
Press to delete files stored in the memory media. You can select and delete up to 32 files at a time.
|
|
2
|
[Change File Name]
Press to change a file name.
|
|
3
|
[Add Files (Scan and Store)]
Press to scan and add a file. |
|
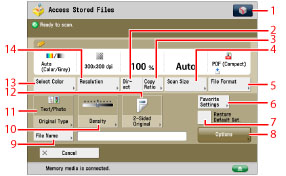
1
|
You can specify the following settings:
Register/Edit Favorite Settings
Register to Quick Menu (See "Quick Menu.")
Changing the Default Settings
|
|
2
|
[Direct]
Press to scan your document in the same size as your original. |
|
3
|
[Copy Ratio]
Press to reduce or enlarge the scanning size of the original.
|
|
4
|
[Scan Size]
Press to set the size of the original that you are going to scan.
|
|
5
|
[File Format]
Press to select the file format for the files to store.
|
|
6
|
[Favorite Settings]
Press to recall scan settings or register frequently used settings in the Favorite Settings.
|
|
7
|
[Restore Default Set.]
Press to cancel all settings. (The machine restores the default settings for Scan and Store.)
|
|
8
|
[Options]
Press to specify useful scan settings, such as scanning different size originals together or dividing originals into multiple batches.
|
|
9
|
[File Name]
Press to assign the file a name.
|
|
10
|
[Density]
Press to adjust the density for scanning. |
|
11
|
[Original Type]
Press to select the type of original (text only, photo only, or both text and photo) you are going to scan.
|
|
12
|
[2-Sided Original]
Press if you are scanning a two-sided original.
|
|
13
|
[Select Color]
Press to select the color for scanning.
|
|
14
|
[Resolution]
Press to select the resolution for scanning.
|

|
1
|
You can specify the following settings: Register/Edit Favorite Settings
Changing the Default Settings
|
|
2
|
[Favorite Settings]
Press to recall scan settings or register frequently used settings in the Favorite Settings. |
|
3
|
[All Pages]
Press to select all the pages for printing. |
|
4
|
[Specify Pages]
Press to specify pages for printing. |
|
5
|
[Restore Default Set.]
Press to cancel all settings. (The machine restores the default settings for Access Stored Files.) |
|
6
|
[Start Printing]
Press to start printing. |
|
7
|
[Options]
Press to specify useful print settings, such as selecting the halftone mode to use for printing, and enlarging the printable area to the edges of the page.
|
|
8
|
[2-Sided Printing]
Press to make two-sided prints.
|
|
9
|
[Finishing]
Press to select the Collate, Group, or Staple mode.
|
|
10
|
[Select Color]
Press to select color mode for printing.
|
|
11
|
[Select Paper]
Press to select the paper size/type and the paper source. |
|
IMPORTANT
|
|
You cannot store documents in the memory media if there is no free space available.
|
|
NOTE
|
|
For information on the types of icons displayed for memory media, see "Types of Advanced Box/Network/Memory Media Icons."
For the procedure regarding [Add Files (Scan and Store)] and instructions on operating the Scan screen, see "Adding a File (Scan and Store)" and "Flow of Scan and Store Operations."
|
