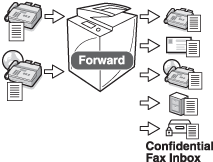
Automatically Forwarding Received Faxes
You can set the machine to automatically forward a received fax to another destination, such as an employee at another branch.
Benefits of Automatic Forwarding
Avoid wasting the time required to transmit information while reducing the possibility of human error. Sending an e-mail notification at the time of forwarding is an effective way to ensure that the forwarded document is viewed at its destination.
|
Required Condition
|
|
The Fax function is available for use.
|
Every Tuesday, Branch Director A from Office A works at Office B for the entire day. This section describes how to set the machine to automatically forward faxes sent to Office A on Tuesdays to Office B where Branch Director A works for the day. Also described is how to print the list of forwarding settings to verify that they are correct.
The screens may differ, depending on the model of the machine and on attached optional products.
Follow the procedures below.
Registering the Fax Number for Office B
Setting the Forwarding Conditions
Registering the Fax Number for Office B
You can perform this procedure using the touch panel display or the Remote UI.
Using the Touch Panel Display
1.
Press

(Settings/Registration) → [Set Destination] → [Register Destinations].
2.
Press [Register New Dest.] → [Fax] → enter "Office B" for the name → press [Next].
3.
Set the fax number for Office B.
These settings can also be specified from the Remote UI.
1.
Access the Remote UI → click [Address Book] → on the Address Lists page, click the address list to register.
2.
Click [Register New Destination] → specify the necessary fields.
Setting the Forwarding Conditions
You can perform this procedure using the touch panel display or the Remote UI.
Using the Touch Panel Display
1.
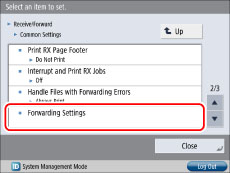
Press
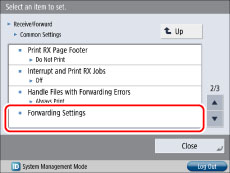
(Settings/Registration) → [Function Settings] → [Receive/Forward] → [Common Settings] → [Forwarding Settings].
2.
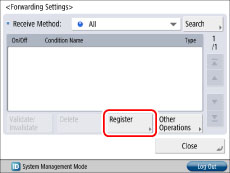
Press [Register] → specify the forwarding condition.
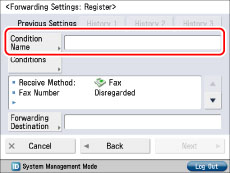
3.
Press [Condition Name] → enter a name for the condition → press [OK].
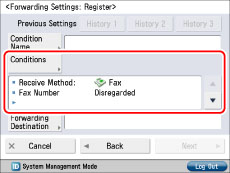
4.
Press [Conditions] → [Fax] for Receive Method → [OK].
All faxes received by Office A will be forwarded.
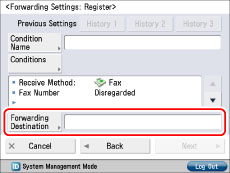
5.
Press [Forwarding Destination] → select the fax number registered for Office B in step 2 from the Address Book → press [OK] → [Next].
6.
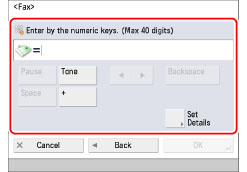
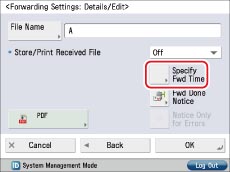
Press [Specify Fwd Time] → specify the time and day from which the forwarding condition will be effective.
7.
Press [Specify Period] → [Add].
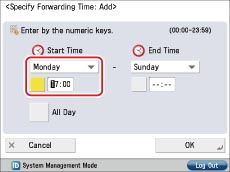
8.
Select [Monday] for <Start Time> → press [

] → enter '1700'.
The forwarding condition is effective from 5 pm on Monday, which is the time that Branch Director A leaves Office A. Faxes received after this time are automatically forwarded to Office B.
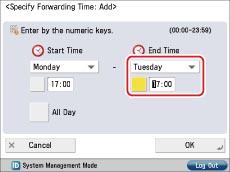
9.
Select [Tuesday] for <End Time> → press [
] → enter '1700'.
The forwarding condition is no longer effective from 5 pm on Tuesday, which is the time that Branch Director A leaves Office B. After this time, faxes received by Office A are no longer forwarded to Office B.
10.
Press [OK] repeatedly until the forwarding settings screen appears.
11.
Select the registered forwarding condition → press [Validate/Invalidate].
The registered forwarding condition is effective, and during the specified time period, faxes received by Office A are forwarded to Office B.
These settings can also be specified from the Remote UI.
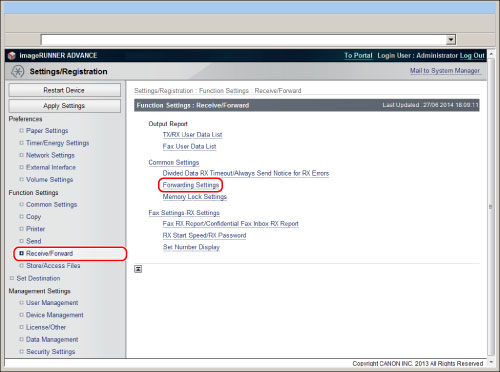
1.
Access the Remote UI → click [Settings/Registration] → [Receive/Forward] → [Forwarding Settings].
2.
Click [Add New Conditions] → specify the necessary fields.
On the screen for registering forwarding conditions, press [Forwarding Done Notice] and register an e-mail address for receiving e-mail notification when forwarding is completed.
If [Notice Only for Errors] is selected, e-mail notification is sent only when forwarding is not correctly completed.
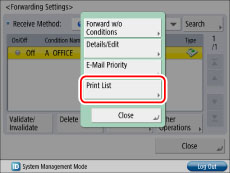
Follow the procedures below to print out a list of the forwarding settings.
1. Press
(Settings/Registration) → [Function Settings] → [Receive/Forward] → [Common Settings] → [Forwarding Settings].
2. Press [Other Operations] → [Print List].
3. Press [Yes] on the confirmation screen to print the list of forwarding settings.